

【Linux存储系列教程】ceph存储的使用
上一期教程:ceph-mimic集群部署
一、基于文件系统的存储
1.创建MDS服务
文件系统存储依赖于
MDS,保存元数据信息
A.在ceph-node1创建MDS服务
[root@ceph-node1 ceph]# vim /etc/ceph/ceph.conf

[global]
fsid = bf6cea08-aaf9-4f2c-9316-f1d1a66fcbc1
mon_initial_members = ceph-node1
mon_host = 192.168.140.10
auth_cluster_required = cephx
auth_service_required = cephx
auth_client_required = cephx
public network = 192.168.140.0/24
mon_allow_pool_delete = true	#添加此段内容,允许将来删除存储池
B.同步配置文件
[root@ceph-node1 ceph]# ceph-deploy --overwrite-conf admin ceph-node1 ceph-node2 ceph-node3
#以下仅展示部分内容
[ceph_deploy.conf][DEBUG ] found configuration file at: /root/.cephdeploy.conf
[ceph_deploy.cli][INFO  ] Invoked (2.0.1): /usr/bin/ceph-deploy --overwrite-conf admin ceph-node1 ceph-node2 ceph-node3
[ceph_deploy.cli][INFO  ] ceph-deploy options:
[ceph_deploy.cli][INFO  ]  username                      : None
[ceph_deploy.cli][INFO  ]  verbose                       : False
[ceph_deploy.cli][INFO  ]  overwrite_conf                : True
[ceph_deploy.cli][INFO  ]  quiet                         : False
[ceph_deploy.cli][INFO  ]  cd_conf                       : <ceph_deploy.conf.cephdeploy.Conf instance at 0x7fc572bae6c8>
[ceph_deploy.cli][INFO  ]  cluster                       : ceph
[ceph_deploy.cli][INFO  ]  client                        : ['ceph-node1', 'ceph-node2', 'ceph-node3']
[ceph_deploy.cli][INFO  ]  func                          : <function admin at 0x7fc57343d320>
[ceph_deploy.cli][INFO  ]  ceph_conf                     : None
[ceph_deploy.cli][INFO  ]  default_release               : False
[ceph_deploy.admin][DEBUG ] Pushing admin keys and conf to ceph-node1
[ceph-node1][DEBUG ] connected to host: ceph-node1
[ceph-node1][DEBUG ] detect platform information from remote host
[ceph-node1][DEBUG ] detect machine type
[ceph-node1][DEBUG ] write cluster configuration to /etc/ceph/{cluster}.conf
[ceph_deploy.admin][DEBUG ] Pushing admin keys and conf to ceph-node2
[ceph-node2][DEBUG ] connected to host: ceph-node2
[ceph-node2][DEBUG ] detect platform information from remote host
[ceph-node2][DEBUG ] detect machine type
[ceph-node2][DEBUG ] write cluster configuration to /etc/ceph/{cluster}.conf
[ceph_deploy.admin][DEBUG ] Pushing admin keys and conf to ceph-node3
[ceph-node3][DEBUG ] connected to host: ceph-node3
[ceph-node3][DEBUG ] detect platform information from remote host
[ceph-node3][DEBUG ] detect machine type
[ceph-node3][DEBUG ] write cluster configuration to /etc/ceph/{cluster}.conf
C.创建三个MDS
避免单点故障
[root@ceph-node1 ceph]# ceph-deploy mds create ceph-node1 ceph-node2 ceph-node3
#以下仅展示部分内容
[ceph_deploy.conf][DEBUG ] found configuration file at: /root/.cephdeploy.conf
[ceph_deploy.cli][INFO  ] Invoked (2.0.1): /usr/bin/ceph-deploy mds create ceph-node1 ceph-node2 ceph-node3
[ceph_deploy.cli][INFO  ] ceph-deploy options:
[ceph_deploy.cli][INFO  ]  username                      : None
[ceph_deploy.cli][INFO  ]  verbose                       : False
[ceph_deploy.cli][INFO  ]  overwrite_conf                : False
[ceph_deploy.cli][INFO  ]  subcommand                    : create
[ceph_deploy.cli][INFO  ]  quiet                         : False
[ceph_deploy.cli][INFO  ]  cd_conf                       : <ceph_deploy.conf.cephdeploy.Conf instance at 0x7fb585e3a758>
[ceph_deploy.cli][INFO  ]  cluster                       : ceph
[ceph_deploy.cli][INFO  ]  func                          : <function mds at 0x7fb585e80050>
[ceph_deploy.cli][INFO  ]  ceph_conf                     : None
[ceph_deploy.cli][INFO  ]  mds                           : [('ceph-node1', 'ceph-node1'), ('ceph-node2', 'ceph-node2'), ('ceph-node3', 'ceph-node3')]
[ceph_deploy.cli][INFO  ]  default_release               : False
[ceph_deploy.mds][DEBUG ] Deploying mds, cluster ceph hosts ceph-node1:ceph-node1 ceph-node2:ceph-node2 ceph-node3:ceph-node3
[ceph-node1][DEBUG ] connected to host: ceph-node1
[ceph-node1][DEBUG ] detect platform information from remote host
[ceph-node1][DEBUG ] detect machine type
[ceph_deploy.mds][INFO  ] Distro info: CentOS Linux 7.9.2009 Core
[ceph_deploy.mds][DEBUG ] remote host will use systemd
[ceph_deploy.mds][DEBUG ] deploying mds bootstrap to ceph-node1
[ceph-node1][DEBUG ] write cluster configuration to /etc/ceph/{cluster}.conf
[ceph-node1][WARNIN] mds keyring does not exist yet, creating one
[ceph-node1][DEBUG ] create a keyring file
[ceph-node1][DEBUG ] create path if it doesn't exist
[ceph-node1][INFO  ] Running command: ceph --cluster ceph --name client.bootstrap-mds --keyring /var/lib/ceph/bootstrap-mds/ceph.keyring auth get-or-create mds.ceph-node1 osd allow rwx mds allow mon allow profile mds -o /var/lib/ceph/mds/ceph-ceph-node1/keyring
[ceph-node1][INFO  ] Running command: systemctl enable ceph-mds@ceph-node1
[ceph-node1][WARNIN] Created symlink from /etc/systemd/system/ceph-mds.target.wants/ceph-mds@ceph-node1.service to /usr/lib/systemd/system/ceph-mds@.service.
[ceph-node1][INFO  ] Running command: systemctl start ceph-mds@ceph-node1
[ceph-node1][INFO  ] Running command: systemctl enable ceph.target
[ceph-node2][DEBUG ] connected to host: ceph-node2
[ceph-node2][DEBUG ] detect platform information from remote host
[ceph-node2][DEBUG ] detect machine type
[ceph_deploy.mds][INFO  ] Distro info: CentOS Linux 7.9.2009 Core
[ceph_deploy.mds][DEBUG ] remote host will use systemd
[ceph_deploy.mds][DEBUG ] deploying mds bootstrap to ceph-node2
[ceph-node2][DEBUG ] write cluster configuration to /etc/ceph/{cluster}.conf
[ceph-node2][WARNIN] mds keyring does not exist yet, creating one
[ceph-node2][DEBUG ] create a keyring file
[ceph-node2][DEBUG ] create path if it doesn't exist
[ceph-node2][INFO  ] Running command: ceph --cluster ceph --name client.bootstrap-mds --keyring /var/lib/ceph/bootstrap-mds/ceph.keyring auth get-or-create mds.ceph-node2 osd allow rwx mds allow mon allow profile mds -o /var/lib/ceph/mds/ceph-ceph-node2/keyring
[ceph-node2][INFO  ] Running command: systemctl enable ceph-mds@ceph-node2
[ceph-node2][WARNIN] Created symlink from /etc/systemd/system/ceph-mds.target.wants/ceph-mds@ceph-node2.service to /usr/lib/systemd/system/ceph-mds@.service.
[ceph-node2][INFO  ] Running command: systemctl start ceph-mds@ceph-node2
[ceph-node2][INFO  ] Running command: systemctl enable ceph.target
[ceph-node3][DEBUG ] connected to host: ceph-node3
[ceph-node3][DEBUG ] detect platform information from remote host
[ceph-node3][DEBUG ] detect machine type
[ceph_deploy.mds][INFO  ] Distro info: CentOS Linux 7.9.2009 Core
[ceph_deploy.mds][DEBUG ] remote host will use systemd
[ceph_deploy.mds][DEBUG ] deploying mds bootstrap to ceph-node3
[ceph-node3][DEBUG ] write cluster configuration to /etc/ceph/{cluster}.conf
[ceph-node3][WARNIN] mds keyring does not exist yet, creating one
[ceph-node3][DEBUG ] create a keyring file
[ceph-node3][DEBUG ] create path if it doesn't exist
[ceph-node3][INFO  ] Running command: ceph --cluster ceph --name client.bootstrap-mds --keyring /var/lib/ceph/bootstrap-mds/ceph.keyring auth get-or-create mds.ceph-node3 osd allow rwx mds allow mon allow profile mds -o /var/lib/ceph/mds/ceph-ceph-node3/keyring
[ceph-node3][INFO  ] Running command: systemctl enable ceph-mds@ceph-node3
[ceph-node3][WARNIN] Created symlink from /etc/systemd/system/ceph-mds.target.wants/ceph-mds@ceph-node3.service to /usr/lib/systemd/system/ceph-mds@.service.
[ceph-node3][INFO  ] Running command: systemctl start ceph-mds@ceph-node3
[ceph-node3][INFO  ] Running command: systemctl enable ceph.target
D.重启服务,让配置文件生效
[root@ceph-node1 ceph]# systemctl restart ceph-mon.target
[root@ceph-node2 ~]# systemctl restart ceph-mon.target
[root@ceph-node3 ~]# systemctl restart ceph-mon.target
2.创建文件存储池
[root@ceph-node1 ceph]# ceph osd pool create cephfs_pool 128
pool 'cephfs_pool' created
[root@ceph-node1 ceph]# ceph osd pool create cephfs_metadata 64
pool 'cephfs_metadata' created
Tips:
- 一个文件系统存储需要两个
RADOS存储池,一个用于存储实体数据,一个用于存储元数据- 上面分别创建两个存储池,名称为
cephfs_pool、cephfs_metadata(名字是自定义的) - 分别指定存储池对应的
PG数量为128,64
- 上面分别创建两个存储池,名称为
- 存储池对应
PG数量参考- 少于
5个OSD则PG数为128 5-10个OSD则PG数为51210-50个OSD则PG数为1024- 如果有更多的
OSD需要自己理解计算
- 少于
PG计算公式Total PGs = ((Total_number_of_OSD * 100) / max_replication_count) / pool_count- 结算的结果往上取靠近
2的N次方的值。比如总共OSD数量是160,复制份数3,pool数量也是3,那么按上述公式计算出的结果是1777.7。取跟它接近的2的N次方是2048,那么每个pool分配的PG数量就是2048。
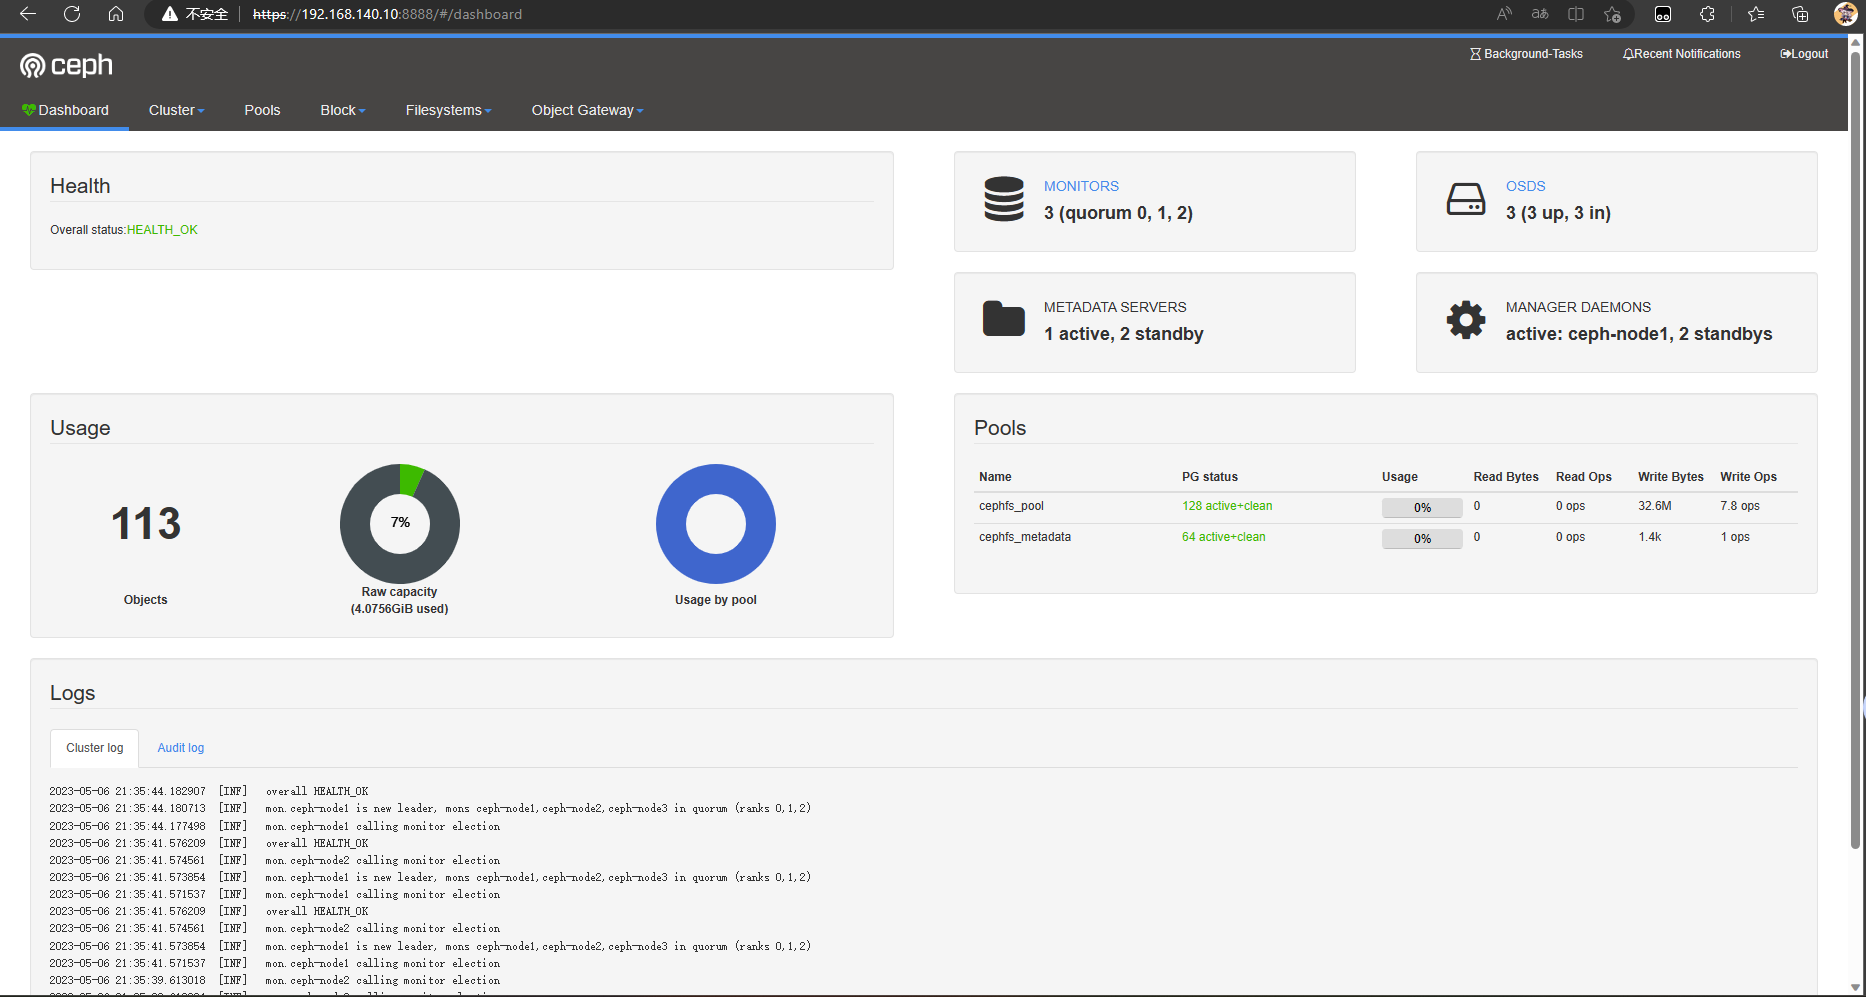
3.查看集群状态
[root@ceph-node1 ceph]# ceph -s
  cluster:
    id:     bf6cea08-aaf9-4f2c-9316-f1d1a66fcbc1
    health: HEALTH_OK

  services:
    mon: 3 daemons, quorum ceph-node1,ceph-node2,ceph-node3
    mgr: ceph-node1(active), standbys: ceph-node3, ceph-node2
    osd: 3 osds: 3 up, 3 in

  data:
    pools:   2 pools, 192 pgs
    objects: 0  objects, 0 B
    usage:   3.0 GiB used, 57 GiB / 60 GiB avail
    pgs:     192 active+clean
4.查看所有存储池
[root@ceph-node1 ceph]# ceph osd pool ls
cephfs_pool
cephfs_metadata
5.查看存储池的详细信息
[root@ceph-node1 ceph]# ceph osd pool get cephfs_pool all
size: 3
min_size: 2
pg_num: 128
pgp_num: 128	#用于管理pg自身的PG
crush_rule: replicated_rule
hashpspool: true
nodelete: false
nopgchange: false
nosizechange: false
write_fadvise_dontneed: false
noscrub: false
nodeep-scrub: false
use_gmt_hitset: 1
auid: 0
fast_read: 0
[root@ceph-node1 ceph]# ceph osd pool get cephfs_metadata all
size: 3
min_size: 2
pg_num: 64
pgp_num: 64	#用于管理pg自身的PG
crush_rule: replicated_rule
hashpspool: true
nodelete: false
nopgchange: false
nosizechange: false
write_fadvise_dontneed: false
noscrub: false
nodeep-scrub: false
use_gmt_hitset: 1
auid: 0
fast_read: 0
6.创建ceph文件系统
[root@ceph-node1 ceph]# ceph fs new cephfs cephfs_metadata cephfs_pool
new fs with metadata pool 2 and data pool 1
A.查看刚刚创建的fs
[root@ceph-node1 ceph]# ceph fs ls
name: cephfs, metadata pool: cephfs_metadata, data pools: [cephfs_pool ]
B.查看mds状态
[root@ceph-node1 ceph]# ceph mds stat
cephfs-1/1/1 up  {0=ceph-node3=up:active}, 2 up:standby
C.查看集群状态
[root@ceph-node1 ceph]# ceph -s
  cluster:
    id:     bf6cea08-aaf9-4f2c-9316-f1d1a66fcbc1
    health: HEALTH_OK

  services:
    mon: 3 daemons, quorum ceph-node1,ceph-node2,ceph-node3
    mgr: ceph-node1(active), standbys: ceph-node3, ceph-node2
    mds: cephfs-1/1/1 up  {0=ceph-node3=up:active}, 2 up:standby
    osd: 3 osds: 3 up, 3 in

  data:
    pools:   2 pools, 192 pgs
    objects: 22  objects, 2.2 KiB
    usage:   3.0 GiB used, 57 GiB / 60 GiB avail
    pgs:     192 active+clean
7.客户端挂载使用
ceph集群默认启用了cephx认证,客户端必须通过认证
A.在ceph-node1节点查看客户端认证的key
[root@ceph-node1 ceph]# cat /etc/ceph/ceph.client.admin.keyring | grep key
	key = AQAGPFZk5DvuJxAAdH/+H6HFcr+Xa55wDWUrkQ==
B.将key导出
ceph给我们提供了导出key的命令
[root@ceph-node1 ceph]# ceph-authtool -p /etc/ceph/ceph.client.admin.keyring > /root/admin.key
[root@ceph-node1 ceph]# cat /root/admin.key
AQAGPFZk5DvuJxAAdH/+H6HFcr+Xa55wDWUrkQ==
C.将key文件传给client客户端
[root@ceph-node1 ceph]# scp -r /root/admin.key root@192.168.140.13:/root/
admin.key                                               100%   41    48.9KB/s   00:00
8.前往client客户端挂载
A.安装依赖
[root@ceph-client ~]# yum install -y ceph-fuse
B.创建测试目录
[root@ceph-client ~]# mkdir /test1
C.挂载
[root@ceph-client ~]# mount -t ceph ceph-node1:6789:/ /test1 -o name=admin,secretfile=/root/admin.key
D.测试
[root@ceph-client ~]# dd if=/dev/zero of=/test1/file01.txt bs=1M count=5000
可前往web界面查看实时动态
9.删除文件存储系统
A.client客户端停止挂载
[root@ceph-client ~]# umount /test1
B.回到node节点,停掉所有MDS服务
[root@ceph-node1 ceph]# for i in 10 11 12
> do
> ssh root@192.168.140.$i systemctl stop ceph-mds.target
> done
C.删除文件系统
[root@ceph-node1 ceph]# ceph fs ls
name: cephfs, metadata pool: cephfs_metadata, data pools: [cephfs_pool ]
[root@ceph-node1 ceph]# ceph fs rm cephfs --yes-i-really-mean-it
删除的时候必须加上
--yes-i-really-mean-it
D.删除存储池
[root@ceph-node1 ceph]# ceph osd pool delete cephfs_metadata cephfs_metadata --yes-i-really-really-mean-it
pool 'cephfs_metadata' removed
[root@ceph-node1 ceph]# ceph osd pool delete cephfs_pool cephfs_pool --yes-i-really-really-mean-it
pool 'cephfs_pool' removed
删除存储池时,如果出现
Error EPERM: pool deletion is disabled; you must first set the mon_allow_pool_delete config option to true before you can destroy a pool,确认在配置文件中添加了mon_allow_pool_delete = true配置项, 需要将集群节点的ceph-mon.target重启
systemctl restart ceph-mon.target
二、块存储
1.将ceph-node1配置文件同步到ceph-client客户端
[root@ceph-node1 ceph]# ceph-deploy admin ceph-client
#以下仅展示部分内容
[ceph_deploy.conf][DEBUG ] found configuration file at: /root/.cephdeploy.conf
[ceph_deploy.cli][INFO  ] Invoked (2.0.1): /usr/bin/ceph-deploy admin ceph-client
[ceph_deploy.cli][INFO  ] ceph-deploy options:
[ceph_deploy.cli][INFO  ]  username                      : None
[ceph_deploy.cli][INFO  ]  verbose                       : False
[ceph_deploy.cli][INFO  ]  overwrite_conf                : False
[ceph_deploy.cli][INFO  ]  quiet                         : False
[ceph_deploy.cli][INFO  ]  cd_conf                       : <ceph_deploy.conf.cephdeploy.Conf instance at 0x7f8ea52f96c8>
[ceph_deploy.cli][INFO  ]  cluster                       : ceph
[ceph_deploy.cli][INFO  ]  client                        : ['ceph-client']
[ceph_deploy.cli][INFO  ]  func                          : <function admin at 0x7f8ea5b88320>
[ceph_deploy.cli][INFO  ]  ceph_conf                     : None
[ceph_deploy.cli][INFO  ]  default_release               : False
[ceph_deploy.admin][DEBUG ] Pushing admin keys and conf to ceph-client
The authenticity of host 'ceph-client (192.168.140.13)' can't be established.
ECDSA key fingerprint is SHA256:GeP9+x/MhwU2ocE8S5QBGyj7+ha7e/v922M6LAJ0wJQ.
ECDSA key fingerprint is MD5:f3:b8:79:87:57:da:90:25:06:21:2f:d6:15:7c:fe:29.
Are you sure you want to continue connecting (yes/no)? yes
Warning: Permanently added 'ceph-client' (ECDSA) to the list of known hosts.
[ceph-client][DEBUG ] connected to host: ceph-client
[ceph-client][DEBUG ] detect platform information from remote host
[ceph-client][DEBUG ] detect machine type
[ceph-client][DEBUG ] write cluster configuration to /etc/ceph/{cluster}.conf
回到ceph-client客户端上操作
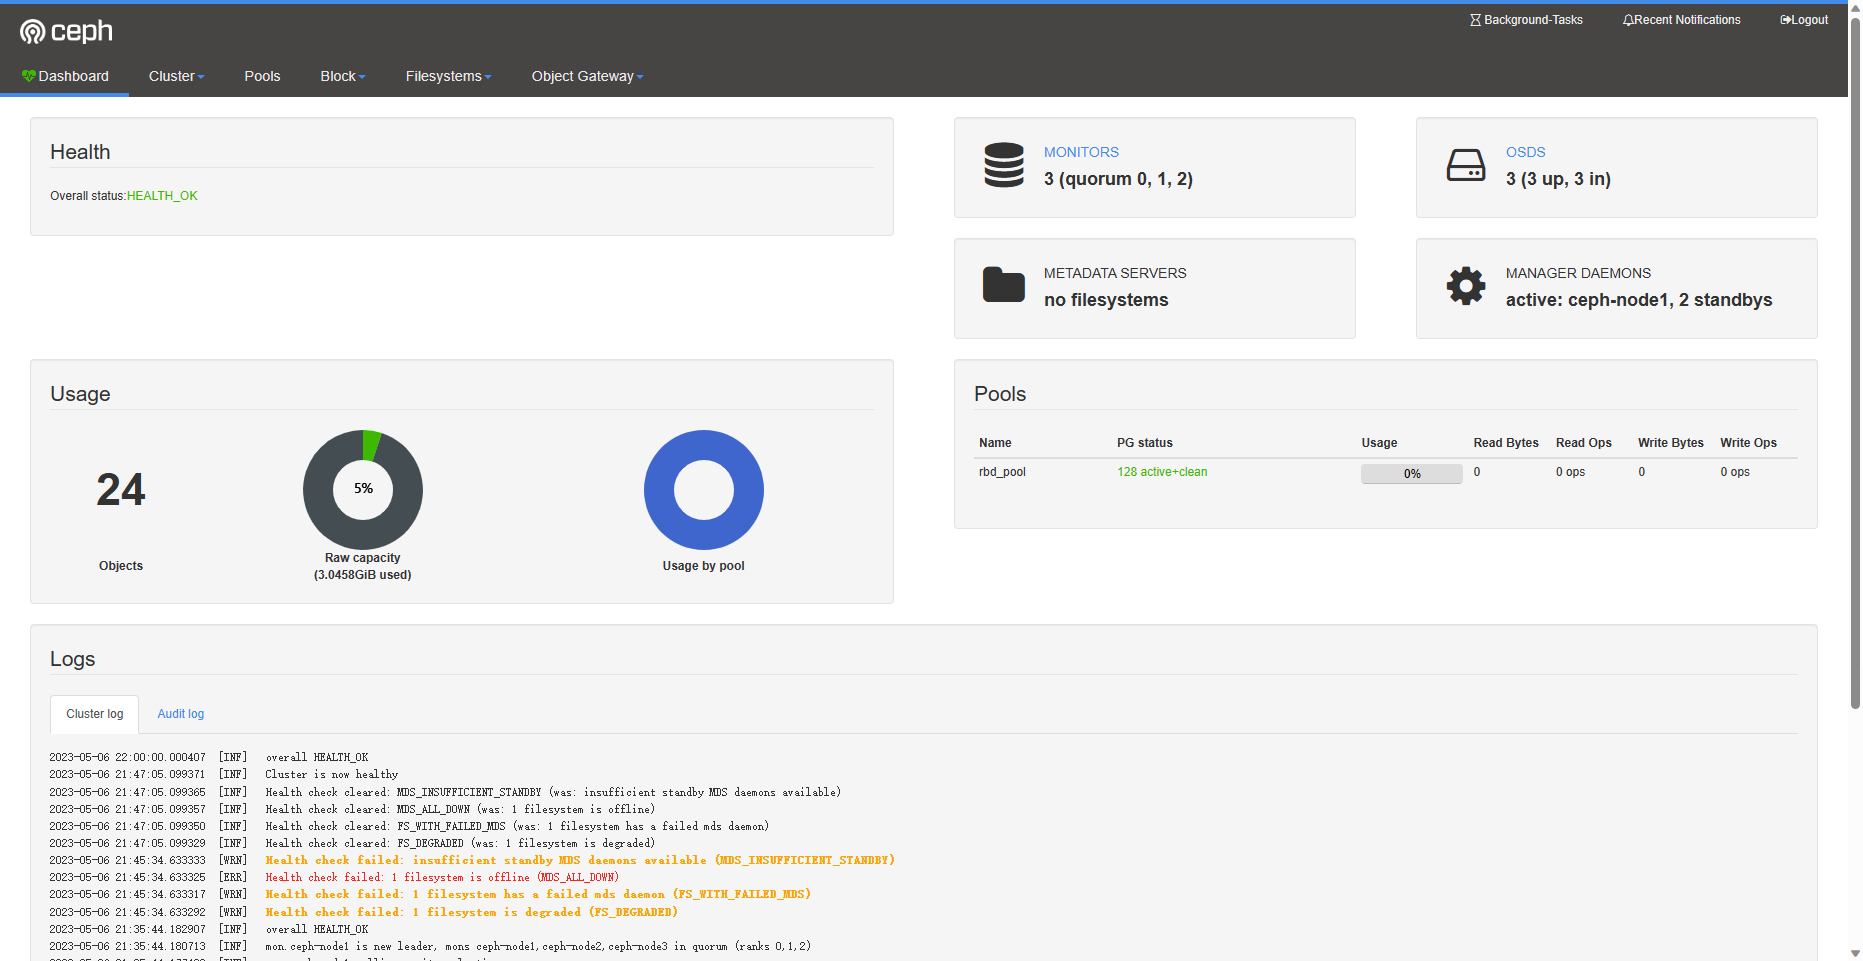
2.创建存储池并且初始化
[root@ceph-client ~]# ceph osd pool create rbd_pool 128
pool 'rbd_pool' created
[root@ceph-client ~]# rbd pool init rbd_pool
3.创建卷
创建一个
20G的卷
[root@ceph-client ~]# rbd delete volume1 --yes-i-really-mean-it
[root@ceph-client ~]# rbd ls rbd_pool
volume1
查看卷详细信息
[root@ceph-client ~]# rbd info volume1 -p rbd_pool
rbd image 'volume1':
	size 20 GiB in 5120 objects
	order 22 (4 MiB objects)
	id: 85626b8b4567
	block_name_prefix: rbd_data.85626b8b4567
	format: 2
	features: layering, exclusive-lock, object-map, fast-diff, deep-flatten
	op_features:
	flags:
	create_timestamp: Sat May  6 21:56:50 2023
4.将卷映射为块设备
[root@ceph-client ~]# rbd map rbd_pool/volume1
rbd: sysfs write failed
RBD image feature set mismatch. You can disable features unsupported by the kernel with "rbd feature disable rbd_pool/volume1 object-map fast-diff deep-flatten".
In some cases useful info is found in syslog - try "dmesg | tail".
rbd: map failed: (6) No such device or address
由于操作系统底层原因,导致映射 失败, 可在系统层将对应的特性关掉
[root@ceph-client ~]# rbd feature disable rbd_pool/volume1 object-map fast-diff deep-flatten
再次重新映射
[root@ceph-client ~]# rbd map rbd_pool/volume1
/dev/rbd0
[root@ceph-client ~]# rbd showmapped
id pool     image   snap device
0  rbd_pool volume1 -    /dev/rbd0
5.格式化
[root@ceph-client ~]# lsblk
NAME            MAJ:MIN RM  SIZE RO TYPE MOUNTPOINT
sda               8:0    0   20G  0 disk
├─sda1            8:1    0  500M  0 part /boot
└─sda2            8:2    0 19.5G  0 part
  ├─centos-root 253:0    0 17.5G  0 lvm  /
  └─centos-swap 253:1    0    2G  0 lvm  [SWAP]
sr0              11:0    1 1024M  0 rom
rbd0            252:0    0   20G  0 disk
[root@ceph-client ~]# mkfs -t xfs /dev/rbd0
Discarding blocks...Done.
meta-data=/dev/rbd0              isize=512    agcount=16, agsize=327680 blks
         =                       sectsz=512   attr=2, projid32bit=1
         =                       crc=1        finobt=0, sparse=0
data     =                       bsize=4096   blocks=5242880, imaxpct=25
         =                       sunit=1024   swidth=1024 blks
naming   =version 2              bsize=4096   ascii-ci=0 ftype=1
log      =internal log           bsize=4096   blocks=2560, version=2
         =                       sectsz=512   sunit=8 blks, lazy-count=1
realtime =none                   extsz=4096   blocks=0, rtextents=0
挂载使用
[root@ceph-client ~]# mkdir /test2
[root@ceph-client ~]# mount /dev/rbd0 /test2
可前往web端查看使用情况
6.扩容和缩容
A.扩容
扩容至
40G
[root@ceph-client ~]# rbd resize --size 40960 rbd_pool/volume1
Resizing image: 100% complete...done.
刷新文件系统
[root@ceph-client ~]# xfs_growfs -d /test2/
查看容量
[root@ceph-client ~]# lsblk
NAME            MAJ:MIN RM  SIZE RO TYPE MOUNTPOINT
sda               8:0    0   20G  0 disk
├─sda1            8:1    0  500M  0 part /boot
└─sda2            8:2    0 19.5G  0 part
  ├─centos-root 253:0    0 17.5G  0 lvm  /
  └─centos-swap 253:1    0    2G  0 lvm  [SWAP]
sr0              11:0    1 1024M  0 rom
rbd0            252:0    0   40G  0 disk /test2
B.缩容
不支持在线直接缩减,缩减后重新格式化
需要卸载磁盘
[root@ceph-client ~]# umount /test2
缩容至
10G
[root@ceph-client ~]# rbd resize --size 10240 rbd_pool/volume1 --allow-shrink
Resizing image: 100% complete...done.
重新格式化
[root@ceph-client ~]# mkfs -t xfs -f /dev/rbd0
Discarding blocks...Done.
meta-data=/dev/rbd0              isize=512    agcount=16, agsize=163840 blks
         =                       sectsz=512   attr=2, projid32bit=1
         =                       crc=1        finobt=0, sparse=0
data     =                       bsize=4096   blocks=2621440, imaxpct=25
         =                       sunit=1024   swidth=1024 blks
naming   =version 2              bsize=4096   ascii-ci=0 ftype=1
log      =internal log           bsize=4096   blocks=2560, version=2
         =                       sectsz=512   sunit=8 blks, lazy-count=1
realtime =none                   extsz=4096   blocks=0, rtextents=0
重新挂载
[root@ceph-client ~]# mount /dev/rbd0 /test2/
[root@ceph-client ~]# df -hT | grep test2
/dev/rbd0               xfs        10G   33M   10G    1% /test2
7.删除块存储
A.取消挂载
[root@ceph-client ~]# umount /test2
[root@ceph-client ~]# rbd unmap /dev/rbd0
B.删除块存储
[root@ceph-client ~]# ceph osd pool delete rbd_pool rbd_pool --yes-i-really-really-mean-itpool 'rbd_pool' removed
三、对象存储
对象存储依赖于
rgw服务
1.回到ceph-node1上创建rgw服务
[root@ceph-node1 ceph]# ceph-deploy rgw create ceph-node1 ceph-node2 ceph-node3
#以下仅展示部分内容
[ceph_deploy.conf][DEBUG ] found configuration file at: /root/.cephdeploy.conf
[ceph_deploy.cli][INFO  ] Invoked (2.0.1): /usr/bin/ceph-deploy rgw create ceph-node1
[ceph_deploy.cli][INFO  ] ceph-deploy options:
[ceph_deploy.cli][INFO  ]  username                      : None
[ceph_deploy.cli][INFO  ]  verbose                       : False
[ceph_deploy.cli][INFO  ]  rgw                           : [('ceph-node1', 'rgw.ceph-node1')]
[ceph_deploy.cli][INFO  ]  overwrite_conf                : False
[ceph_deploy.cli][INFO  ]  subcommand                    : create
[ceph_deploy.cli][INFO  ]  quiet                         : False
[ceph_deploy.cli][INFO  ]  cd_conf                       : <ceph_deploy.conf.cephdeploy.Conf instance at 0x7f1522f83f80>
[ceph_deploy.cli][INFO  ]  cluster                       : ceph
[ceph_deploy.cli][INFO  ]  func                          : <function rgw at 0x7f15237d2140>
[ceph_deploy.cli][INFO  ]  ceph_conf                     : None
[ceph_deploy.cli][INFO  ]  default_release               : False
[ceph_deploy.rgw][DEBUG ] Deploying rgw, cluster ceph hosts ceph-node1:rgw.ceph-node1
[ceph-node1][DEBUG ] connected to host: ceph-node1
[ceph-node1][DEBUG ] detect platform information from remote host
[ceph-node1][DEBUG ] detect machine type
[ceph_deploy.rgw][INFO  ] Distro info: CentOS Linux 7.9.2009 Core
[ceph_deploy.rgw][DEBUG ] remote host will use systemd
[ceph_deploy.rgw][DEBUG ] deploying rgw bootstrap to ceph-node1
[ceph-node1][DEBUG ] write cluster configuration to /etc/ceph/{cluster}.conf
[ceph-node1][WARNIN] rgw keyring does not exist yet, creating one
[ceph-node1][DEBUG ] create a keyring file
[ceph-node1][DEBUG ] create path recursively if it doesn't exist
[ceph-node1][INFO  ] Running command: ceph --cluster ceph --name client.bootstrap-rgw --keyring /var/lib/ceph/bootstrap-rgw/ceph.keyring auth get-or-create client.rgw.ceph-node1 osd allow rwx mon allow rw -o /var/lib/ceph/radosgw/ceph-rgw.ceph-node1/keyring
[ceph-node1][INFO  ] Running command: systemctl enable ceph-radosgw@rgw.ceph-node1
[ceph-node1][WARNIN] Created symlink from /etc/systemd/system/ceph-radosgw.target.wants/ceph-radosgw@rgw.ceph-node1.service to /usr/lib/systemd/system/ceph-radosgw@.service.
[ceph-node1][INFO  ] Running command: systemctl start ceph-radosgw@rgw.ceph-node1
[ceph-node1][INFO  ] Running command: systemctl enable ceph.target
[ceph_deploy.rgw][INFO  ] The Ceph Object Gateway (RGW) is now running on host ceph-node1 and default port 7480	#默认服务跑在7480端口
2.查看集群
[root@ceph-node1 ceph]# ceph -s
  cluster:
    id:     bf6cea08-aaf9-4f2c-9316-f1d1a66fcbc1
    health: HEALTH_OK

  services:
    mon: 3 daemons, quorum ceph-node1,ceph-node2,ceph-node3
    mgr: ceph-node1(active), standbys: ceph-node3, ceph-node2
    osd: 3 osds: 3 up, 3 in
    rgw: 3 daemons active

  data:
    pools:   4 pools, 32 pgs
    objects: 187  objects, 1.1 KiB
    usage:   3.0 GiB used, 57 GiB / 60 GiB avail
    pgs:     32 active+clean

  io:
    client:   90 KiB/s rd, 0 B/s wr, 91 op/s rd, 58 op/s wr
3.在ceph-client客户端测试对象网关
A.创建测试用户
[root@ceph-client ~]# radosgw-admin user create --uid="testuser" --display-name="first user" | grep -E "access_key|secret_key"
            "access_key": "7ZIQY6MC4L2QZTP31SW4",
            "secret_key": "x1Rzw9PcvCQm1eKgmSdSxsRU1aI1SCrdJ1NvhmVU"
请记住这里的
key,每个人的都不一样哦!
B.安装测试工具s3cmd
[root@ceph-client ~]# yum install -y s3cmd
C.修改配置文件
[root@ceph-client ~]# vim /root/.s3cfg
[default]
access_key = 7ZIQY6MC4L2QZTP31SW4	#这里替换你刚刚拿到的key
secret_key = x1Rzw9PcvCQm1eKgmSdSxsRU1aI1SCrdJ1NvhmVU	#这里替换你刚刚拿到的key
host_base = 192.168.140.10:7480
host_bucket = 192.168.140.10:7480/%(bucket)
cloudfront_host = 192.168.140.10:7480
use_https = False
D.创建bucket桶
[root@ceph-client ~]# s3cmd mb s3://test_bucket
Bucket 's3://test_bucket/' created
查看
[root@ceph-client ~]# s3cmd ls
2023-05-06 14:38  s3://test_bucket
E.测试上传文件
[root@ceph-client ~]# s3cmd put /etc/fstab s3://test_bucket
upload: '/etc/fstab' -> 's3://test_bucket/fstab'  [1 of 1]
 465 of 465   100% in    1s   366.05 B/s  done
F.测试下载文件
[root@ceph-client ~]# cd /tmp
[root@ceph-client tmp]# s3cmd get s3://test_bucket/fstab
download: 's3://test_bucket/fstab' -> './fstab'  [1 of 1]
 465 of 465   100% in    0s    10.90 KB/s  done
[root@ceph-client tmp]# ls
fstab
4.删除bucket桶
[root@ceph-client tmp]# s3cmd del s3://test_bucket/fstab
delete: 's3://test_bucket/fstab'	#先删除文件
[root@ceph-client tmp]# s3cmd rb s3://test_bucket
Bucket 's3://test_bucket/' removed	#再删除桶
【Linux存储系列教程】ceph存储的使用
https://www.wsjj.top/archives/106
评论