
[Ai-Agent系列教程]OpenClaw(原ClawdBot)手动部署教程
本教程基于Ubuntu24.04LTSC版本部署,推荐最低使用2c4g配置安装
项目开源地址:https://github.com/openclaw/openclaw
一、环境准备
- NodeJS 22
- Docker-CE
1.安装NodeJS
sudo apt update && sudo apt install -y curl
curl -fsSL https://deb.nodesource.com/setup_22.x | sudo -E bash -
sudo apt install -y nodejs build-essential
node -v

v22.22.0	#如果看到版本输出代表安装成功
2.安装Docker
注意:本次安装与以往教程不同,本次为Ubuntu系统安装,如果您是CentOS请看这篇教程【容器应用系列教程】容器介绍、Docker的安装和基本操作
安装依赖
sudo apt install -y \
    ca-certificates \
    curl \
    gnupg \
    lsb-release \
    software-properties-common
创建密钥存储目录
sudo install -m 0755 -d /etc/apt/keyrings
添加Docker的GPG密钥(使用国内阿里云)
curl -fsSL https://mirrors.aliyun.com/docker-ce/linux/ubuntu/gpg | sudo gpg --dearmor -o /etc/apt/keyrings/docker.gpg
设置文件权限
sudo chmod a+r /etc/apt/keyrings/docker.gpg
添加Docker软件源(使用国内阿里云)
echo \
  "deb [arch=$(dpkg --print-architecture) signed-by=/etc/apt/keyrings/docker.gpg] https://mirrors.aliyun.com/docker-ce/linux/ubuntu \
  $(. /etc/os-release && echo "$VERSION_CODENAME") stable" | \
  sudo tee /etc/apt/sources.list.d/docker.list > /dev/null
安装Docker
# 更新软件包索引
sudo apt update

# 安装 Docker CE、CLI 和 containerd
sudo apt install -y docker-ce docker-ce-cli containerd.io

# 检查安装的版本
docker --version
启动Docker并加入开机启动项
sudo systemctl enable --now docker
配置镜像加速
sudo vim /etc/docker/daemon.json

#把下面的内容粘贴进去
{
    "registry-mirrors": [
        "https://docker.m.daocloud.io",
        "https://docker.1panel.live",
        "https://hub.rat.dev",
        "https://registry.sbmihoyo.com",
        "https://registry-1.docker.io"
    ]
}
重启Docker测试
sudo systemctl restart docker
二、安装OpenClaw(原ClawdBot)
1.安装必要的依赖
sudo apt install -y git
2.拉取仓库到本地
git clone https://github.com/openclaw/openclaw.git
3.构建项目
cd openclaw
npm install -g pnpm@latest
pnpm install
pnpm ui:build
pnpm build
4.启动项目
pnpm openclaw onboard --install-daemon
5.快速配置项目
I understand this is powerful and inherently risky. Continue?
│  ● Yes / ○ No	#这里选择yes
Onboarding mode
│  ● QuickStart (Configure details later via openclaw configure.)	#快速开始
│  ○ Manual
Model/auth provider
│  ○ OpenAI
│  ○ Anthropic
│  ○ MiniMax	#推荐使用国内模型
│  ● Qwen (OAuth)	#推荐使用国内模型,本教程使用Qwen进行演示
│  ○ Synthetic
│  ○ Venice AI
│  ○ Google
│  ○ Copilot
│  ○ OpenRouter
│  ○ Vercel AI Gateway
│  ○ Moonshot AI
│  ○ Z.AI (GLM 4.7)
│  ○ Xiaomi
│  ○ OpenCode Zen
│  ○ Skip for now
wen auth method
│  Qwen OAuth	#我这里选择登录
│
◒  Starting Qwen OAuth….│
◇  Qwen OAuth ────────────────────────────────────────────────╮
│  #这里的登录地址每个人都不一样                                   │
│  Open                                                       │
│  https://chat.qwen.ai/authorize?user_code=xxxxxxxx&client=  │
│  qwen-code                                                  │
│  to approve access.                                         │
│  If prompted, enter the code AOAVJN5L.                      │
│                                                             │
├─────────────────────────────────────────────────────────────╯
Default model
│  ● Keep current (qwen-portal/coder-model)	#这里保持默认
│  ○ Enter model manually
│  ○ qwen-portal/coder-model
│  ○ qwen-portal/vision-model
Select channel (QuickStart)
│  ○ Telegram (Bot API)
│  ○ WhatsApp (QR link)
│  ○ Discord (Bot API)
│  ○ Google Chat (Chat API)
│  ○ Slack (Socket Mode)
│  ○ Signal (signal-cli)
│  ○ iMessage (imsg)
│  ○ Nostr (NIP-04 DMs)
│  ○ Microsoft Teams (Bot Framework)
│  ○ Mattermost (plugin)
│  ○ Nextcloud Talk (self-hosted)
│  ○ Matrix (plugin)
│  ○ BlueBubbles (macOS app)
│  ○ LINE (Messaging API)
│  ○ Zalo (Bot API)
│  ○ Zalo (Personal Account)
│  ○ Tlon (Urbit)
│  ● Skip for now (You can add channels later via `openclaw
channels add`)	#我这里选择跳过,后续可通过WebUI再次配置
Configure skills now? (recommended)
│  Yes	#可选择安装技能
│
◇  Homebrew recommended ──────────────────────────────╮
│                                                     │
│  Many skill dependencies are shipped via Homebrew.  │
│  Without brew, you'll need to build from source or  │
│  download releases manually.                        │
│                                                     │
├─────────────────────────────────────────────────────╯
│
◇  Show Homebrew install command?
│  Yes	#选择安装技能
│
◇  Homebrew install ──────────────────────────────────────────╮
│                                                             │
│  Run:                                                       │
│  /bin/bash -c "$(curl -fsSL                                 │
│  https://raw.githubusercontent.com/Homebrew/install/HEAD/i  │
│  nstall.sh)"                                                │
│                                                             │
├─────────────────────────────────────────────────────────────╯
│
◆  Preferred node manager for skill installs
│  ○ npm
│  ● pnpm	#推荐使用pnpm
│  ○ bun
◻ Skip for now (Continue without installing dependencies)
│  ◻ 🔐 1password
│  ◻ 📝 apple-notes
│  ◻ ⏰ apple-reminders
│  ◻ 🐻 bear-notes
│  ◻ 🐦 bird
│  ◻ 📰 blogwatcher
│  ◻ 🫐 blucli
│  ◻ 📸 camsnap
│  ◻ 🧩 clawdhub
│  ◻ 🎛️ eightctl
│  ◻ ♊️ gemini
│  ◻ 🧲 gifgrep
│  ◻ 🐙 github
│  ◻ 🎮 gog
│  ◻ 📍 goplaces
│  ◻ 📧 himalaya
│  ◻ 📨 imsg
│  ◼ 📦 mcporter (Use the mcporter CLI to list, configure, auth,
and call MCP servers/tools directly (HTTP …)	#推荐安装MCP管理,方便后续添加
│  ◻ 📊 model-usage
│  ◻ 🍌 nano-banana-pro
│  ◻ 📄 nano-pdf
│  ◻ 💎 obsidian
│  ◻ 🎙️ openai-whisper
│  ◻ 💡 openhue
│  ◻ 🧿 oracle
│  ◻ 🛵 ordercli
│  ◻ 👀 peekaboo
Set GOOGLE_PLACES_API_KEY for goplaces?
│  No	#这里配置密钥全部跳过
│
◇  Set GOOGLE_PLACES_API_KEY for local-places?
│  No	#这里配置密钥全部跳过
│
◇  Set GEMINI_API_KEY for nano-banana-pro?
│  No	#这里配置密钥全部跳过
│
◇  Set NOTION_API_KEY for notion?
│  No	#这里配置密钥全部跳过
│
◇  Set OPENAI_API_KEY for openai-image-gen?
│  No	#这里配置密钥全部跳过
│
◇  Set OPENAI_API_KEY for openai-whisper-api?
│  No	#这里配置密钥全部跳过
│
◇  Set ELEVENLABS_API_KEY for sag?
│  No	#这里配置密钥全部跳过
Enable hooks?
│  ◻ Skip for now
│  ◼ 🚀 boot-md (Run BOOT.md on gateway startup)
│  ◼ 📝 command-logger (Log all command events to a centralized
audit file)
│  ◼ 💾 session-memory (Save session context to memory when /new
command is issued)	#这里推荐全部勾选
Gateway service already installed
│  ● Restart	#因为我这里之前安装过,我就不重复安装了,你需要选择install
│  ○ Reinstall
│  ○ Skip
How do you want to hatch your bot?
│  ○ Hatch in TUI (recommended)
│  ● Open the Web UI	#为了方便管理,我使用webui
│  ○ Do this later
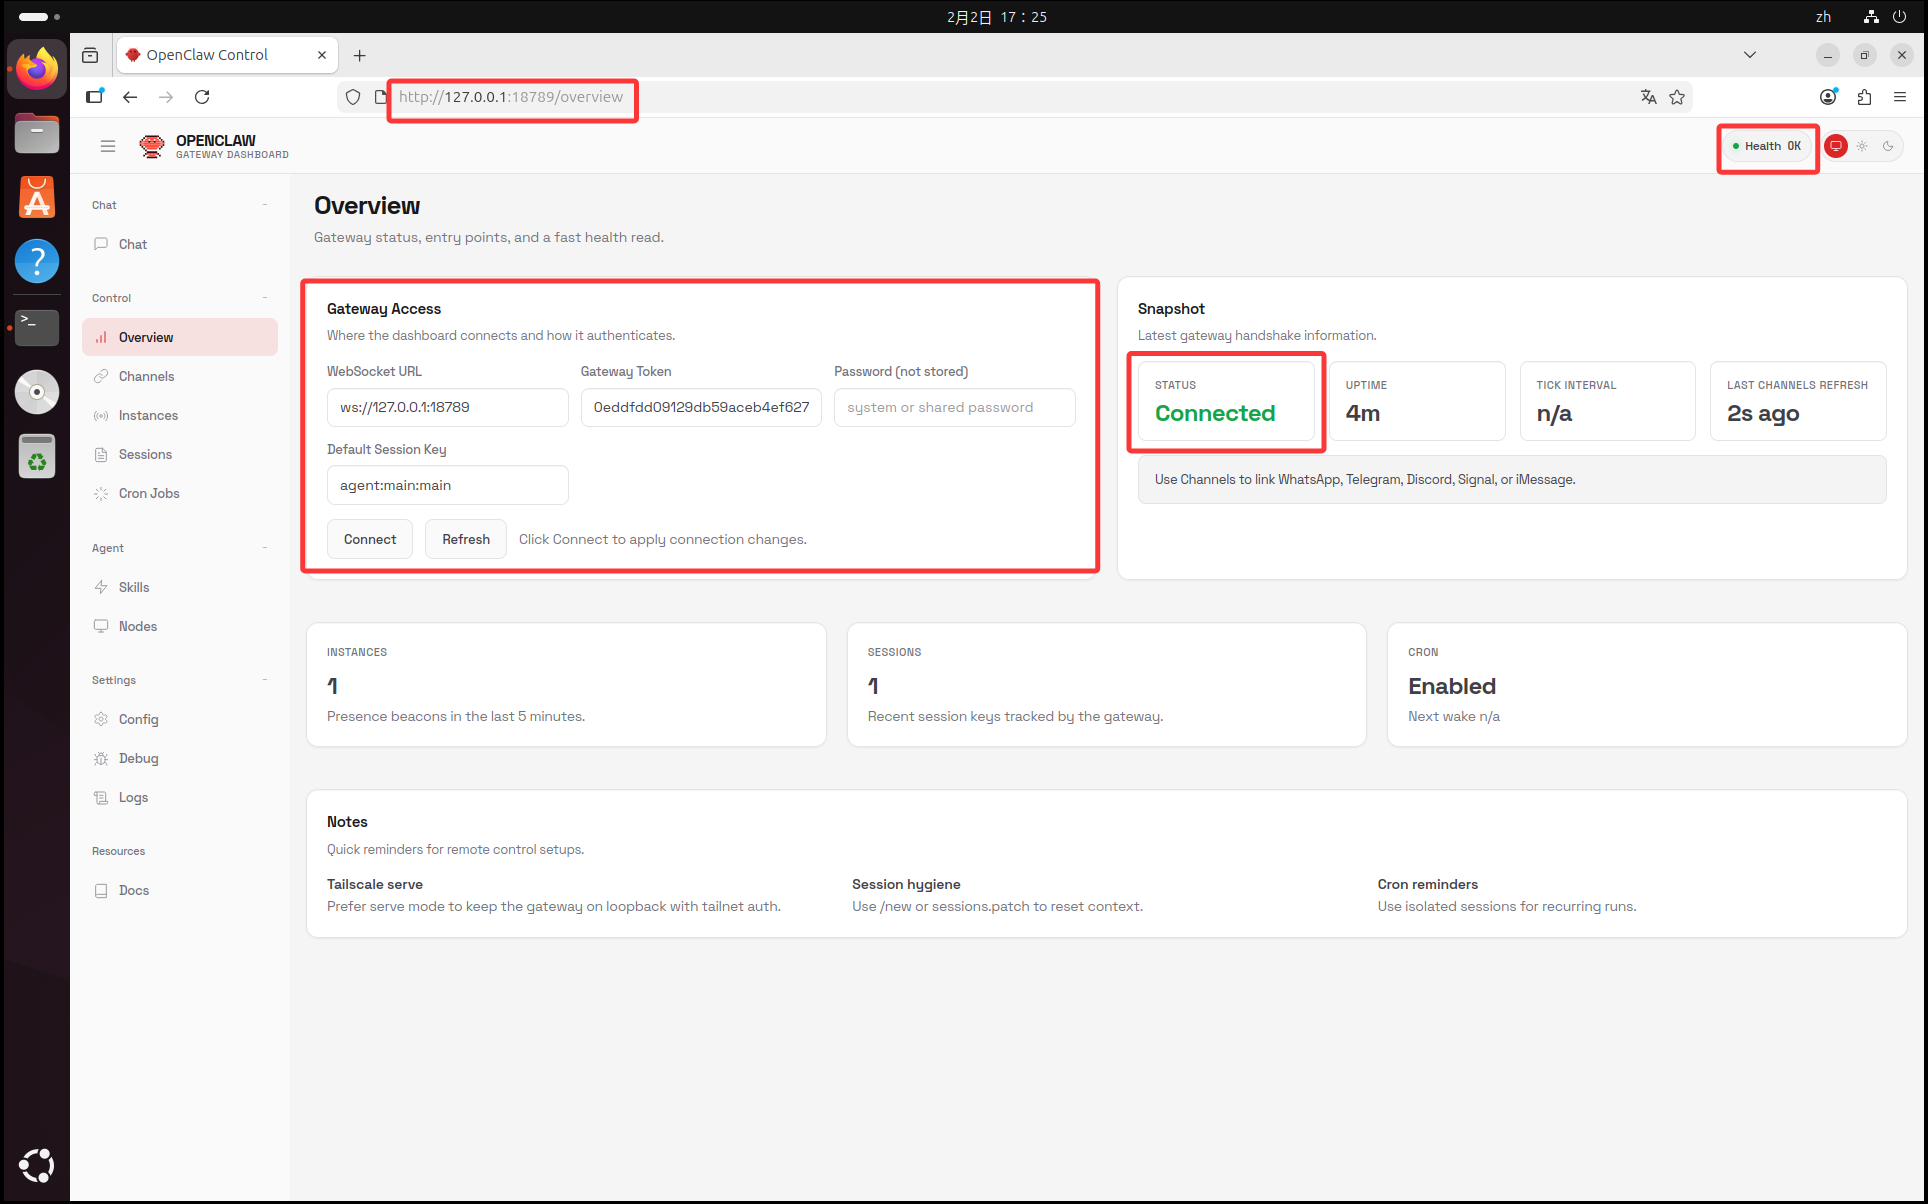
6.访问WebUI
注意:因为特殊性,建议不要把openclaw端口暴露到公网使用!!!
#打开浏览器输入以下内容
http://127.0.0.1:18789/?token=你的终端输出的token

#如果您不方便复制,可以使用以下命令查看token
sudo cat ~/.openclaw/openclaw.json | grep token
访问成功截图
三、命令管理
1.需要进入项目目录下输入命令
cd ~/openclaw && pnpm openclaw -v
> openclaw@2026.1.29 openclaw /root/openclaw-main
> node scripts/run-node.mjs -v

2026.1.29
2.获取命令帮助
pnpm openclaw --help

> openclaw@2026.1.29 openclaw /root/openclaw-main
> node scripts/run-node.mjs --help


🦞 OpenClaw 2026.1.29 (unknown) — Siri's competent cousin.

Usage: openclaw [options] [command]

Options:
  -V, --version     output the version number
  --dev             Dev profile: isolate state under
                    ~/.openclaw-dev, default gateway port 19001,
                    and shift derived ports (browser/canvas)
  --profile <name>  Use a named profile (isolates
                    OPENCLAW_STATE_DIR/OPENCLAW_CONFIG_PATH under
                    ~/.openclaw-<name>)
  --no-color        Disable ANSI colors
  -h, --help        display help for command

Commands:
  setup             Initialize ~/.openclaw/openclaw.json and the
                    agent workspace
  onboard           Interactive wizard to set up the gateway,
                    workspace, and skills
  configure         Interactive prompt to set up credentials,
                    devices, and agent defaults
  config            Config helpers (get/set/unset). Run without
                    subcommand for the wizard.
  doctor            Health checks + quick fixes for the gateway and
                    channels
  dashboard         Open the Control UI with your current token
  reset             Reset local config/state (keeps the CLI
                    installed)
  uninstall         Uninstall the gateway service + local data (CLI
                    remains)
  message           Send messages and channel actions
  memory            Memory search tools
  agent             Run an agent turn via the Gateway (use --local
                    for embedded)
  agents            Manage isolated agents (workspaces + auth +
                    routing)
  acp               Agent Control Protocol tools
  gateway           Gateway control
  daemon            Gateway service (legacy alias)
  logs              Gateway logs
  system            System events, heartbeat, and presence
  models            Model configuration
  approvals         Exec approvals
  nodes             Node commands
  devices           Device pairing + token management
  node              Node control
  sandbox           Sandbox tools
  tui               Terminal UI
  cron              Cron scheduler
  dns               DNS helpers
  docs              Docs helpers
  hooks             Hooks tooling
  webhooks          Webhook helpers
  pairing           Pairing helpers
  plugins           Plugin management
  channels          Channel management
  directory         Directory commands
  security          Security helpers
  skills            Skills management
  update            CLI update helpers
  status            Show channel health and recent session
                    recipients
  health            Fetch health from the running gateway
  sessions          List stored conversation sessions
  browser           Manage OpenClaw's dedicated browser
                    (Chrome/Chromium)
  help              display help for command

Examples:
  openclaw channels login --verbose
    Link personal WhatsApp Web and show QR + connection logs.
  openclaw message send --target +15555550123 --message "Hi" --json
    Send via your web session and print JSON result.
  openclaw gateway --port 18789
    Run the WebSocket Gateway locally.
  openclaw --dev gateway
    Run a dev Gateway (isolated state/config) on ws://127.0.0.1:19001.
  openclaw gateway --force
    Kill anything bound to the default gateway port, then start it.
  openclaw gateway ...
    Gateway control via WebSocket.
  openclaw agent --to +15555550123 --message "Run summary" --deliver
    Talk directly to the agent using the Gateway; optionally send the WhatsApp reply.
  openclaw message send --channel telegram --target @mychat --message "Hi"
    Send via your Telegram bot.

Docs: docs.openclaw.ai/cli
3.网关操作
pnpm openclaw gateway start	#启动网关
pnpm openclaw gateway restart #重启网关
pnpm openclaw gateway status	#查看网关状态
pnpm openclaw gateway stop	#停用网关
[Ai-Agent系列教程]OpenClaw(原ClawdBot)手动部署教程
https://www.wsjj.top/archives/openclaw
评论